A call queue lines up your callers in a queue while your users or employees are busy with other calls. The queued calls are distributed to your next available user in the order they are received, allowing you to serve your customers promptly, courteously, and efficiently.
When a new call comes into the queue, the call is distributed in priority order to the primary members in the call queue group. A call queue group is a group of agents who will take the calls that come into that queue. The participating members, and their priority within the queue, are defined by the queue administrator when the queue is set up. Each queue can also have secondary members set up to handle overflow calls to the primary group of members. Primary and secondary groups work as follows:
- Agents in the primary extension group are called first (in priority order). When all agents in the primary group are busy, calls in the queue are routed to the secondary members until the maximum number of callers in the secondary queue has been reached.
- When the maximum number of callers in the queue has been reached and all agents in the primary and secondary extension groups are busy, the next caller is forwarded to the queue’s voicemail. The maximum number of callers can range from 1 to 20 and is set by the queue administrator.
Calls coming through the queue are distributed on a cyclic, round robin basis based on agent availability. If all agents on your primary and secondary queue extension groups are busy, and the maximum number of callers in queue has not been reached, the next call that comes into the queue will go to the queue IVR message. Queue administrators can set how often this repeating message plays as the caller waits for the next available agent. If all agents remain busy, this caller hears the hold music, followed by a repeating Queue IVR. At this point, the caller has the option to leave a voicemail in the queue voicemail box or to continue to hold until the next agent becomes available.
Features
- Configure greetings, messages, and hold music for callers while they wait to be served.
- Define the maximum number of calls (up to 20) to wait in the queue.
- Allow users to log themselves in and out of queues, if desired.
- Assign a user to one or more call queues. Users can switch between call queues as needed.
- Allocate primary and secondary member groups. Members must be part of the same phone system, but can come from multiple sites.
- Allocate multiple phone numbers to a call queue.
- Access a voicemail box for each queue.
Limitation
In a multi-PBX system all the users in one call queue must reside within the same PBX or phone system.
![]()
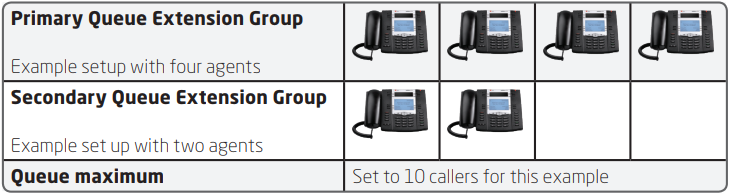
The AcmeHealth clinic receives a high volume of calls from patients seeking to schedule appointments. To ensure timely service to the patients, the clinic creates a dedicated call queue and assigns four primary members and two secondary members for its appointment desk. Callers calling to schedule an appointment are directed to appointment desk representatives via the call queue. Calls wait in the queue, and are offered to the available representatives in the same order they are received. If seven calls come to the queue, the first four calls go to the four agents of the primary group, the next two calls go to the two agents of the secondary group, and the caller seven hears the queue IVR until the next available agent picks up the call.
Since the maximum number of waiting calls in this queue example is 10, calls are automatically forwarded to the queue voicemail if there are 11 or more simultaneous calls in the queue.
![]()
Set up a Call Queue and Add Members
Configuring a call queue requires you to create a queue first. You then set up a voicemail and call forwarding for when the calls overflow, establish IVR rules to route the calls, and finally add primary and secondary members to the group to answer the calls.
To set up a call queue:
- Go to Home > Call Queues, and click + Create Call Queue.
- Enter the Basic information, such as call queue's name and site. Call queue automatically inherits the time zone and language specified for the site, unless you specify otherwise.
- Enter a number for Maximum calls in queue. You can have up to 20 calls in the queue at any given time.
- Enter Wrap-up time. The wrap-up time is up to 75 seconds for the current call before accepting the next call from the queue.
- Enter the Delay after not answering (maximum 120 seconds) .
If an agent does not answer a call, additional calls are not offered to this agent for the maximum time entered in this field. This time gives an unscheduled or emergency break to the user. If the user's phone rings for some time to alert the user and the user does not pick up the phone, chances are that the user is away from his desk. The system gives the user a break to get back to the station. - Enter the Total time to alert a member (Max 30 seconds). If a user does not pick up the phone within the time entered, they are assumed unavailable. This option determines the total time a user's phone must ring before the call is moved to another agent or back to the queue.
Enable Allow agents to log in and log out from assigned queues. If enabled, users can log themselves in and out of queue using the 8x8 Work for Desktop or an IP phone. If disabled, users are automatically logged in to the call queue.
Note: You can quickly view users login permission in a call queue by checking the call queue's summary. See login permission in a call queue.
- Scroll down to configure IVR Message. The left-side navigation menu allows you to jump to the desired section quickly without having to scroll multiple screens. For details see our content on IVR Messages.
- Add Primary members. You must add at least one user as the primary member. You can search users by first name, last name, or email ID. You can select members from all sites within the same phone system (PBX).
- Add Secondary members (optional). A group of users can be assigned to both a primary and secondary members group. The secondary members can be set up to handle overflow calls from the primary group. If all agents on the primary and secondary groups are busy, and the maximum number of calls in the queue is reached, the next call is forwarded to the queue's voicemail. If you remove a user from the member's list, the user is removed from her assigned queue.
- Set up a password in Voicemail settings. To learn more, see Voicemail Settings.
- Set up Call forwarding rules. To learn more, see Call Forwarding Rules.
- Click Save.


![]()
Set Up Call Queue IVR Messages
In the call queue's edit page, scroll down to see IVR Message. The left-side navigation menu allows you to jump to the desired section quickly without having to scroll multiple screens. In the IVR messages, set up the following options:
- Initial Queue Greeting: The first IVR message is the initial queue greeting which is played when all agents are busy. For example: "All our representatives are busy, please remain on the line and your call will be answered as soon as possible." Click Change to select, upload, or record an audio file. If no audio file is selected, the default audio file will be played.
- Music-on-hold: You can play a hold music while callers are waiting for the next available agent. If all agents remain busy, the caller hears the hold music, followed by a repeating Queue IVR. At this point, the caller has the option to leave a voicemail in the queue voicemail, or to continue to hold until the next agent becomes available. See how to set up a music on hold. Click Change to select, upload, or record an audio file. If no audio file is selected, the default audio file will be played.
- Repeating Queue Message: You can play a repeating queue messages at intervals while the caller is waiting for the next available agent. For example: “Your call is important to us. It will be answered in the order it was received, please continue to hold or press 2 to leave a message.” At this time, the caller has the option to leave a voicemail in the queue voicemail or to continue to hold until the next agent becomes available.
You can enter a number for Repeat queue message interval. The maximum time between the messages is 45 seconds. While the caller waits in the queue, they hear the message repeated every 45 seconds. Click Change to select, upload, or record an audio file. If no audio file is selected, the default audio file will be played. - Allow callers to leave voicemail: If enabled, callers can dial 2 to leave a voice messages while waiting in the queue.
![]()
Set Up Voicemail Settings for Call Queues
For call queue Voicemail Settings, set up the following options:
- External voicemail greeting: Greeting played for people outside the company. In the absence of a custom external voicemail greeting, the default audio greeting is played.
- Internal voicemail greeting: Greeting played for people inside the company. In the absence of a custom internal voicemail greeting, the default audio greeting is played.
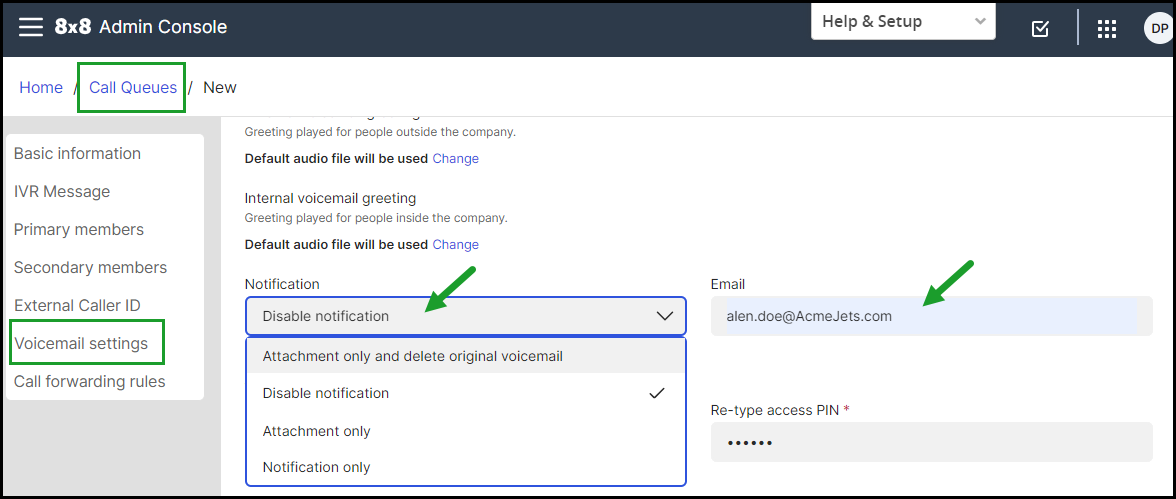
- Notification: choose one of the following notification options:
- Attachment only and delete original voicemail - Set up a group email address to receive voicemails, then delete it from the service. You don’t have to enable the access of any group member to voicemail (group members no longer receive voicemails in their email boxes because they always will be empty).
- Disable Notification - Set up a group member to receive voicemail notifications. At least one group member should have voicemail access enabled (because voicemails are built up in the box).
- Attachment only - Set up a group member to receive voicemail notifications. At least one group member should have voicemail access enabled (because voicemails are built up in the box)
-
- Notification only - Set up a group member to receive voicemail notifications. At least one group member should have voicemail access enabled (because voicemails are built up in the box)
Note: When you try to disable all the group members, and you choose the Attachment only and delete original voicemail option, you don’t have to enable the access of any group member to voicemail. A warning notification displays for other options, and you must enable at least one member to have voicemail access.
- Email: enter the email address to be associated with the voicemail.
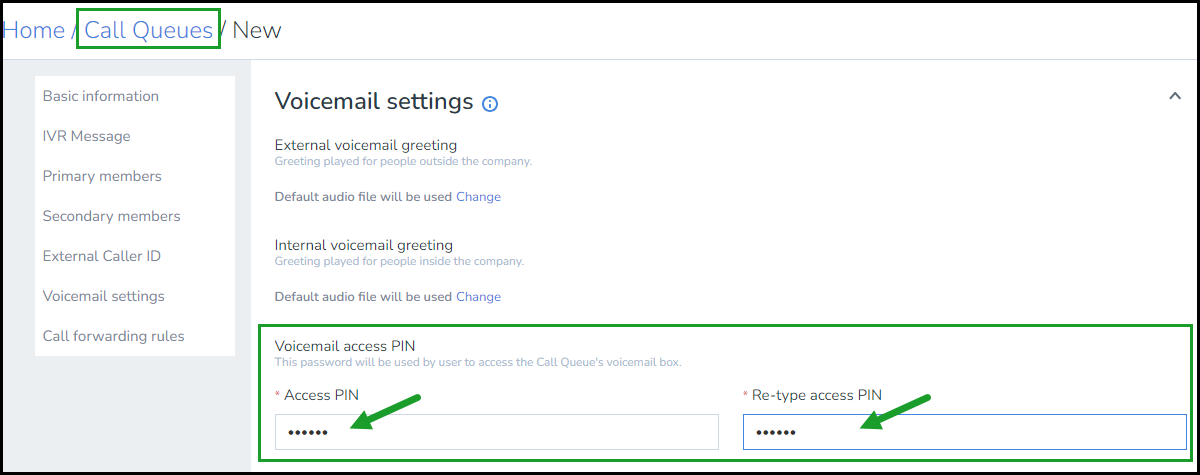
- Voicemail access PIN: Set up the access PIN for the call queue’s voicemail box. The members need the password to access the queue's voicemail. The password is numeric-only, and must contain 6 to 15 non-sequential digits. You can direct calls to the call queue's voicemail by editing the call forwarding settings. To access the call queue voicemail, you have to be a queue's member. Dial <555> from your assigned number, or <500> from any other phone to access the voicemail.
To enable group voicemail notifications:
- Go to Home > Call Queues, and click Voicemail settings in the left menu.
- Select the desired call queue.
- Under Voicemail settings, select the desired option from the Notification list.
- Attach an email address where the notification will be sent.
- Click Save.
To set up a voicemail access PIN:
- Go to Home > Call Queues, and click Voicemail settings in the left menu.
- Under Voicemail access PIN, enter and confirm the voicemail access PIN for the call queue’s voicemail box.
To access call queue voicemail and options over the phone:
- From any extension in your 8x8 system, dial 500.
- Enter the call queue extension number and press #.
- Enter the call queue voicemail password and press #.
- From the Main Menu:
- Press 1 to listen to your messages.
- Press 2 to change your greeting.
- Press 3 to manage user preference options: change voicemail password, call waiting preferences, busy handling, ring no answer handling, Internet outage routing, and email notification preferences.
- Press 4 to establish or change call forwarding rules. Options include: listen to, set, change, or cancel call forwarding rules.
- Press 5 to set a specific greeting for business hours, after business hours, lunch time, meeting, weekend, and vacation.
- Press 6 to enable or disable Announcement Only mode (e.g., your vacation greeting).
- Press 9 to exit voicemail.
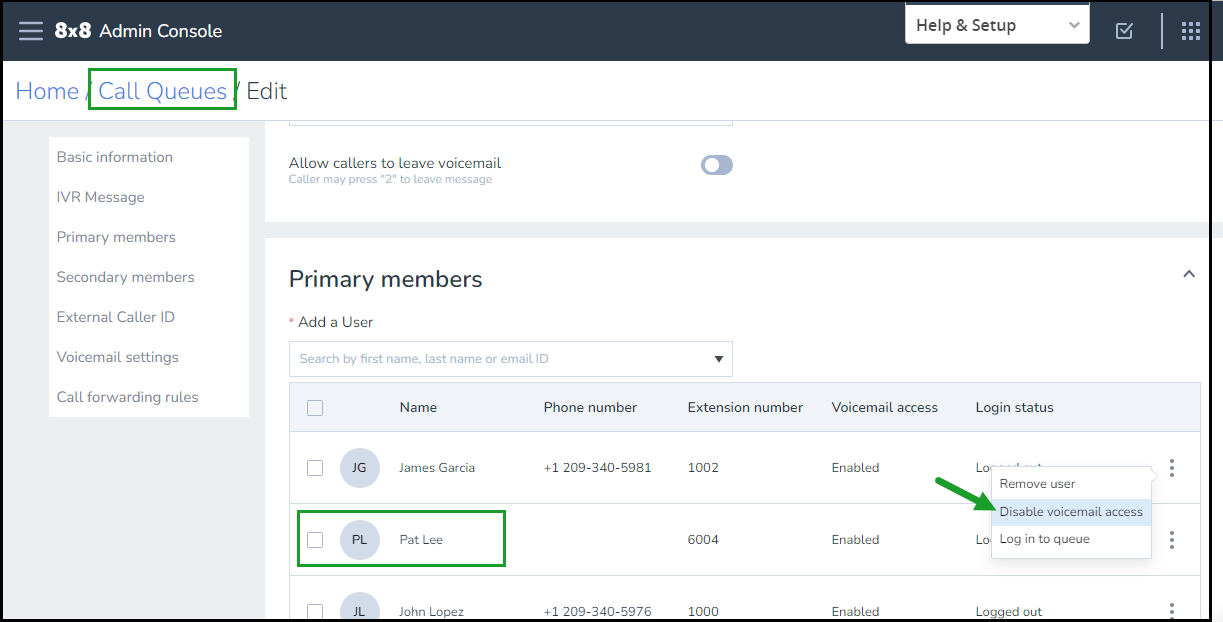
You can disable the user's voicemail access by clicking ![]() next to a member and select Disable voicemail access.
next to a member and select Disable voicemail access.
![]()
Set Up Call Forwarding Rules for Call Queues
You can set up call forwarding rules for a call queue when the Internet connection is down, the queue is full, or the queue has reached its maximum capacity. You can also forward the calls when all agents are logged out, or have a server side Do Not Disturb (DND) status.
To edit the call forwarding rules:
- Go to Home > Call Queues and create or edit a call queue.
- Open Call forwarding rules.
- Click
 next to a rule.
 - You can forward incoming calls to Voicemail or Selected user or service. Select another user from the list or transfer the call to a custom target. The custom target can be an extension number or a telephone number. For example, you can enter a short number, such as 7878, without the dial plan in the target selector and save. The custom number appears in the call forwarding rules.
- Click to save the call queue.
If you do not forward the calls, the callers can only hear a ring tone. To learn more, see FAQ: How do I access my call queue voicemail?
![]()
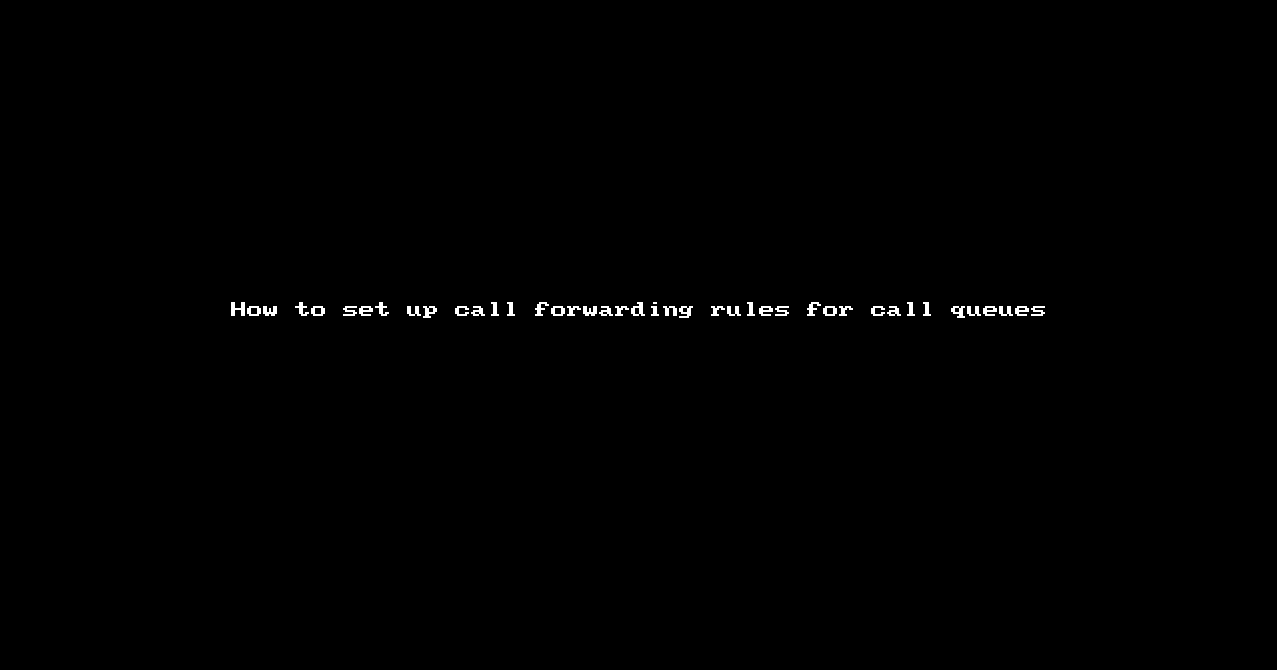
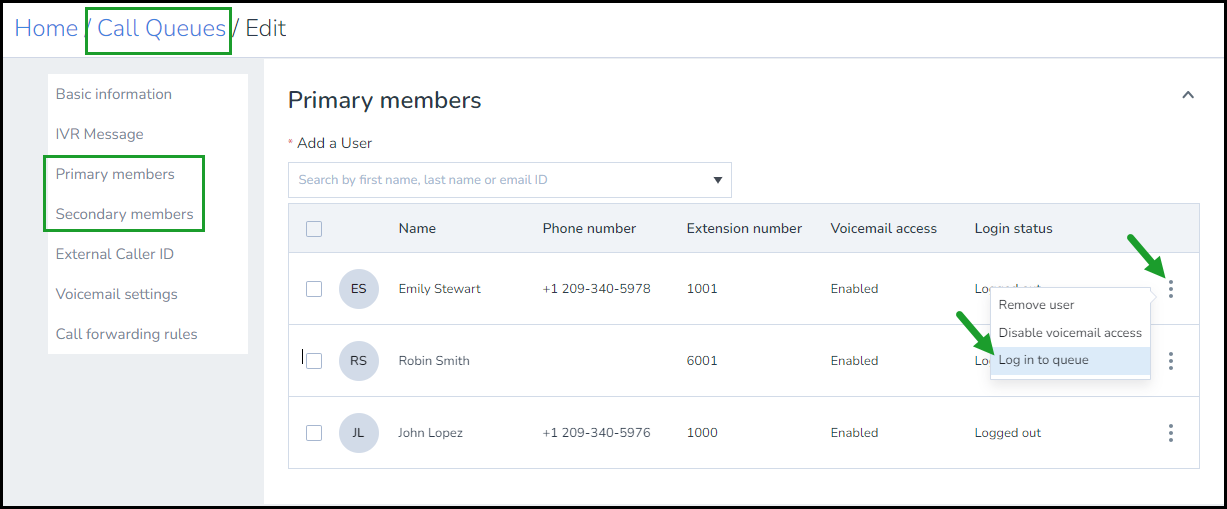
Log Users in and Out of Queues
Administrators can monitor the call queue and add members when needed. They can easily log in users to a call queue or log them out from within 8x8 Admin Console.
To log a user in and out of call queues:
- Go to Home > Call Queues.
- Click
 to edit a call queue.
 - In the Primary members or Secondary members list, click
 next to the member you want to log in to this queue, and select Log in to queue or Log out from queue as applicable.
![]()
View Call Queue Summary Information
You can quickly check a call queue's information by opening the call queue's Info Panel.
To view call queue summary information:
- Go to Home > Call Queues.
- Click a call queue to open the call queue's Info Panel.
- You can check the PBX, site, extension number, primary and secondary members, users permission to log in and out of the queue, call forwarding rules, and more.